Back to TheWorxHub for Senior Living Main Menu
Adding and Managing Fixed Assets
How to Add a New Fixed Asset
- Click the Add button at the top right corner of the screen and select Fixed Asset from the drop-down menu.
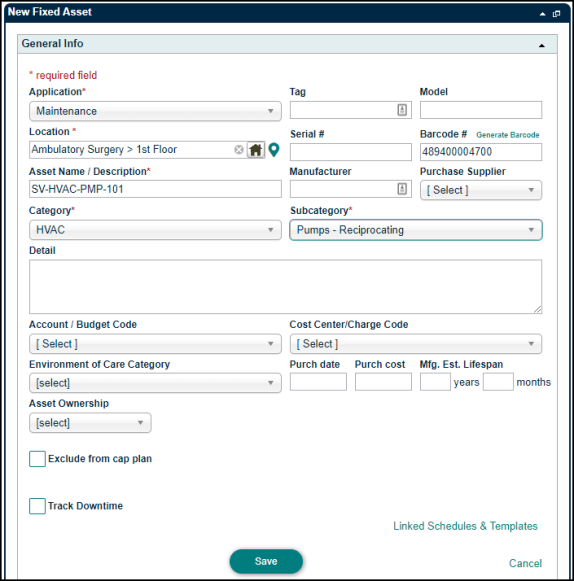
- Select the Department the asset belongs to in the drop-down menu.
- Use the Location Picker (
 ) to choose a location for the new asset.
- If you have access to the Space Management application, click the map pin icon (
 ) to select a location from a floor plan drawing. *Note: If you do not currently have this application, please contact your Sales Representative or Client Services for more information.
- If you have access to the Space Management application, click the map pin icon (
- Add a brief Asset Name/Description.
- Choose a Category and Subcategory for the asset from the pick lists.
- Select an Account/Budget Code if applicable.
- You can enter a barcode in one of two ways:
- Enter the Barcode # manually.
or
- Click the Generate Barcode link to automatically create a new barcode number.
- Enter as much additional detail as possible about the asset in the available fields on the New Fixed Asset form.
-
If the asset’s replacement cost will be tracked using Capital Planning, enter the Purch date, Purch cost, and Mfg. Est Lifespan. *Note: The Capital Planning application is required to use this feature. Please contact your Sales Representative or Client Services for more information.
- If the asset is owned by a resident, check the Resident owned check box.
- If this asset is not managed under Capital Planning, check the Exclude from cap plan box.
- If the asset can be reserved, check the Can be reserved check box. *Note: The Room Bookings application is required to use this feature. Please contact your Sales Representative or Client Services for more information.
- If you would like to manage downtime for this asset, check the Track Downtime box.
- Click Save.
- Once you click Save, new fields will appear on the asset info page which can be completed as necessary.
Expand the Asset panels by clicking on the panel title and enter any information needed.
How to Duplicate a Fixed Asset
- Search for the asset you would like to duplicate by clicking the Search tab (
 ) and selecting Assets.
 - Enter the details of the asset in the search fields and click Search Now.
- Click on the Asset Name/Description shown in the search results to open that asset record.
- Click the Open in Tab button to open the asset in a Smart Tab at the top of the screen.
- Exit the window and click on the Fixed Asset Smart Tab.
- Click on the down arrow beside the New Asset button and select Duplicate Asset in the drop-down menu.
-
Make any adjustments required to make this new asset unique, then click Save. *Note: Modifications typically include the Location and Serial #. When adding multiples of the same item to the same room, just adjust the Serial #.
Linking a Fixed Asset to a Work Order
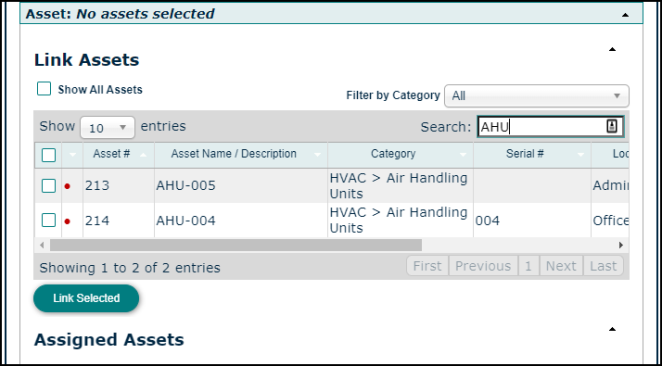
- Click and expand the Asset panel at the bottom of the work order.
- Enter a keyword in the Simple Search field at the top right of the Asset panel to narrow down the assets list.
- Check the box next to the asset(s) you want, then click Link Selected to link the asset(s) to the work order. *Note: If the asset is marked to track downtime, linking the asset to the work order will remove the asset from service and create a downtime event. Once the work order is completed, the asset will return to service.
Linking Safety Notes
Linking safety notes to assets ensures that every work order linked to that asset will show the asset safety notes. *Note: You must add Safety Notes to your WorxHub account prior to linking them to either assets or work orders.
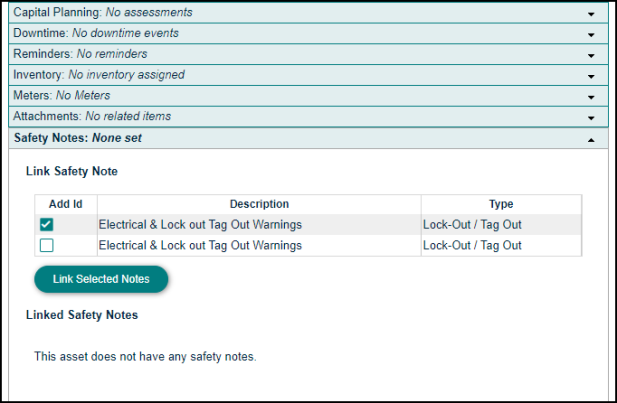
- Open the Safety Notes panel of any asset or work order.
- Check the box next to the Safety Note Description.
- Click Link Selected Notes.
-
Each time a work order is linked to an asset with safety notes, the safety notes display on the work order, on the work order print out, and inside Mobile Worx.
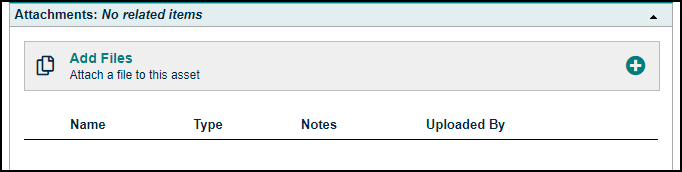
Adding an Attachment to an Asset
TheWorxHub lets you quickly add an attachment to an asset. Files can be uploaded from your computer or chosen from the File Library.
- Open the Attachments panel of the asset, then click the Add Files link.
- The File Selection window will display a list of files recently uploaded to the File Library.
- Use the Search field to search for additional files.
- Check the box for any file you would like to attach to the asset, then click the Add Files button.
- If the file does not currently exist in the library, click the +New File button to attach the file to the asset.
- In the window that appears, choose the source of the attachment. *Note: If a new image or document is attached to the asset, it will also be uploaded to the File Library.
- Select Choose File to upload a file from your computer.
- Select Dropbox to link to a file in a Dropbox account.
- Select URL to enter a link to a document or file on a web page.
-
If you have selected the wrong file, click the Remove link and repeat this process to select the correct file.
- Enter a note or description of the file in the optional Notes field, then click the Add Files button.
Changing the Status of a Fixed Asset
You can change the status of an asset to reflect that it is no longer in service. This will prevent the item from being selected on future work orders.
- Search for the asset you would like to change by clicking the Search tab () and selecting Assets.
- Enter the details of the asset in the search fields and click Search Now.
- Click on the Asset Name/Description shown in the search results to open that asset record.
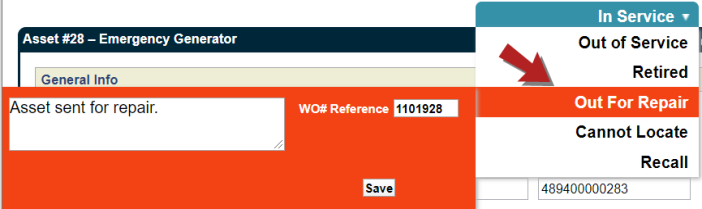
- Choose the appropriate Status from the drop-down menu in the upper right corner of the asset info page.
- In Service - The asset is available for use.
- Out of Service - The asset is temporarily withdrawn from use. *Note: If you are tracking downtime for the asset, changing the status to "Out of Service" will create a downtime event for the asset.
- Retired - The asset is withdrawn from use for an extended period or is permanently removed from service. For example, an asset that was damaged, sold, or replaced.
- Out For Repair - The asset is being repaired.
- Cannot Locate - The location of the asset is unknown.
- Recall - The asset is removed from service to address a problem identified by the manufacturer.
- In the window that appears, use the text box to enter a reason for the change. If the change occurred in relation to a work order, enter the work order number in the WO# Reference field.
- Click Save.